I added a live weather widget to my grafana birdbox camera monitoring dashboard, in case I can't be bothered to look out of the window.
Dark Sky weather data
I did an earlier post that described getting my camera feeds into this setup here.
I used info on Michael Green's blog post here as inspiration for my setup.
This is the updated version, not a lot going on apart from the wind rattling the windows...
The weather bit is in the top left corner, it pulls weather data from an online weather visualisation app called Dark Sky. It's added via a short piece of modifiable html code into an iframe panel on the grafana dashboard that runs in a docker container on a Raspberry pi. It was a bit of a pain to get running , so I'm going to document it in case anyone else wants to do this.
Note that the 'accelerometer' style graphs are populated by a temperature and humidity sensor in one of the bird boxes themselves.
Steps / considerations
I'm running grafana version v6.3.6 in a docker container on a Raspberry pi. If you go to the grafana website you'll see a darksky plugin that can also be used... I didn't go that route, instead opted for (what I thought) would be simpler, namely adding a short bit of html to a text panel in html mode (see my original post on this) , this proved not to be the case... The iframe embed method is described in this helpful blog post.
In theory, you just add the iframe html into a new grafana panel and set it to txt/html mode.
It's quite configurable, e.g. the colour of the text and background/font used and temperature units used - I'm in the UK so have set it to degrees celsius.
You'll need to substitute the XXXX and YYYY for your latitude and longitude so that the weather data is relevant to your location. I sourced my location via this handy postcode to lat/long converter
So in theory its as simple as dropping in a bit of html - no it isnt...
There's a configuration option that needs to be changed, otherwise an ifram wont render, and you just get a string of text. In the grafana server admin screen, if you scroll down to the [panels] section there is a setting called 'disable_sanitise_html = false', this needs to be changed to ' = true' or your iframe wont load. You would think that changing it directly here would be possible? ...but it isn't
Note - I've updated it in my version. the default is 'false'
How to fix it depends on how you're running garafana. If you've installed grafana locally, then you just need to directly edit the grafani.ini file, which is located in /etc/grafana/grafana.ini.
In my case I've set it up in a docker container which makes editing the file a bit more tricky- editing it directly does not work either but I'll describe the process as its handy to know how to connect to a running docker container and modify ts contents:
SSH into the Rassberry pi running Docker, and by definition your grafana container
Find the container ID of the grafana container
docker container ls -a
Connect to the container as root
docker exec -it <container-name> bash
To edit the grafana.ini file, you'll need to install a txt editor inside the docker container first
apt-get update
apt-get install nano
Then edit the file in nano, updating the disable_sanitise_html = false to true
nano /etc/grafana/grafana.ini
Save the file, exit the container.
SO.. that should fix it? WRONG. The config screen in the web interface as described above will still show this setting as = false. Loads of forums recommend restarting the docker container, which has not effect either. Running the command 'service grafana-server restart' within the docker container also has not effect.
The solution..
The trick is to pass 'disable_sanitise_html = true' to a docker image as an environmental variable at the point that a docker image is spun up into a container. To make this work, I committed my existing grafana container back to an image file (this is essentially making a backup/snapshot of a container), then re-launched the new local image file with the environmental variable added:
#run newly saved image file with environmental variable set
docker run -d -p 3000:3000 -e GF_PANELS_DISABLE_SANITIZE_HTML=true  grafana:1_Nov
Note that I wanted to keep my modification to the stock docker image for my modified version of grafana. If you want to apply it to the stock grafana image on dockerhub.com then use this command to spin up a new container:
#or add environmental variable option to the image on docker hub:
docker run -d --name=grafana -p 3000:3000 -e GF_PANELS_DISABLE_SANITIZE_HTML=true grafana/grafana:6.3.6
I've squished the DarkSky iframe down a bit on my dashboard, if you make it bigger within its grafana panel, you get this which has some pretty cool animated effects too
I made a CCTV-type monitoring screen to present multiple birdbox cameras together + environmental monitoring data, using a Grafana / Docker container on a Raspberry pi...
The screenshot below shows all five of my currently active bird boxes. The foot in the top Left box belongs to a blue tit that spends quite a lot of time in there the moment (roosts too). The temperature graph and widgets are populated by a temp + humidity sensor in the bottom R box that logs to its own internal environment every minute - the data really is an in-box box environment monitor.
EDIT Nov 2019: New blog post describing addition of web-sourced weather data to grafana
Prerequisites.. quite a lot of groundwork. This project relies on various stuff already existing:
(1) Multiple birdbox camera streams
Most of mine use Raspberry Pi ZeroW mini computers + v2 camera modules running motion capture & streaming software called pikrellcam. The top L one is a motion jpeg stream from a webcam on an early first raspberry pi model that has been going strong since 2014, the camera window could do with a clean though, our early evening roosting blue tit is present in this one:
(2) Some environmental data.
The aim is to present environmental data relevant to to the camera feeds. The bottom R bird box has a sensor that logs its internal temp & humidity every minute to a mysql database, and is used to populate the temperature plot:
Temperature plot over time, current humidity and temps also showing
Equally there are plenty of free sources of weather data that could be used to provide a feed - it would be fun to see what the weather is locally too.
(3) A 'video dashboard'
The main point of this post. The dashboard runs on the newest model from the Raspberry pi foundation, the Model 4B (4Gb ram version). This has faster wired networking, more ram available, and generally more processing ooph. I would NOT advocate putting one in a bird box unless you're planning on keeping roosting birds warm over the winter. Mine sits 'headless' (ie with no monitor/keyboard etc) in the lounge behind the TV. I've set it up with fixed IP address (wired, not wireless), and is accessed via SSH from a laptop. I'm not going into detail for that as there are countless 'how-to's' out there. Lets call this machine 'Hub-Pi'.
Hub-Pi setup as follows
Docker
Docker provides a seamless(ish) way of running 'OS-level virtualization software in packages called containers'. Basically there are a lot of freely available pre-configured software 'images' that allow rapid deployment of software without having to fiddle about with setup. I've used a Docker image of a dashboard application called Grafana.
Install Docker on Hub-Pi: I used the guide on this site, up to the bit about 'swarming' (ignore from then).
Docker works by first downloading a specified image. It then creates a live 'container' from that which is what you 'do stuff with'. The 'docker run...' command specifies how the resulting container is configured. If a container is deleted then all configuration data within the container is lost and you need to re-create a container from the original image and loose all your work in the process. You can 'commit' a container back to a fresh image at any time, again Google is your friend.
Install Grafana Docker image: Docker images are supposed to run on any hardware running Docker... sort of. A base image is built with respect to the architecture of the CPU of the machine it runs on. This basically means that Raspberry Pis are different to PCs (Arm vs AMD64). I'm not totally clear on the difference, but an image built for one may not work on the other. Many images are built for both CPU architecture and Docker intuitively picks the right one to run. Mostly.
On writing this, the most recent Grafana image is 6.4.3. The Arm (is for Raspberry pi) version is somehow broken, so I had to revert back to version 6.3.6, which runs fine. The Docker command to pull down the right Grafana image and create a Docker container that runs it is...
docker run -d --name=grafana -p 3000:3000 grafana/grafana:6.3.6
If you omit the :6.3.6 bit you'll get the current image which may be fixed in a future version, but didi not work for me.
This command is saying:
Pull down the v6.3.6 of the Grafana image from DOckerHub.
Run it (make container) and forward port 3000 to the host computers port 3000.
Assuming the container runs, if you navigate to the Pi's IP address in a web browser that you fixed earlier, using port 3000 (http://HubPiIPaddressHere:3000), if its connected to a screen & keyboard use localhost:3000 directly then you get to the Grafana main login screen where you can assign a new password
Addition of camera feeds to Grafana
To make a camera feed in Grafana, got to..
Add Panel, then choose 'Text' from the visualisation options.
Based on the two types of video feds that I currently have, I edited the text in html mode as shown below.
My network video streams are of two flavours:
(1) Using webcams to generate a motion JPEG (MJPEG) stream, add the following to the html:
<img src="http://XXX.XXX.X.XX:YYY/?action=stream">
where XXX.XXX.X.XX is the IP address of the remote source and YYYY is the port it streams from
(2) Using Raspberry Pi v2 camera modules and pikrellcam software, add the following to the html:
<a href="http://XXX.XXX.X.XX" target="_blank"/a>
<img src="http://XXX.XXX.X.XX/mjpeg_stream.php"">
Where XXX.XXX.X.XX - the IP address of the remote Pi running pikrellcam. This also adds a convenient hyperlink to the video in the dashboard to the main pikrellcam page for that camera where motion captured video can be reviewed.
Once a video feed is added you can manually drag it about and resize it to fit your screen. Simple.
Potential developments...
This is an early version. I plan to add in local weather data, e.g. from https://www.wunderground.com/. I have entrance hole activity counter on one of my boxes (soon three), so it would be good to see a plot of activity associated with each video feed too.
It's all very well having a bird box camera that you can view on a PC/ipad/etc, I wanted an unobtrusive static monitor, so I made one
My little Elf Helpers demonstrating their bird box monitor
Some prerequisites....
Bird box camera live streaming to your local network that can be viewed via a web-browser on a PC / ipad / other tablet computer.
In my case I use Pikrellcam software running on a Raspberry Pi-equipped bird box with raspberry pi camera module (see arecent blog post on the nest that is showing on this ).
My normal way of monitoring this box on a PC using pikrellcam looks like this...
To get a minimal interface, you need to switch the Raspberry to 'kiosk mode'. This means that when it boots up, it loads a specific website and removes extraneous stuff from the active window such as mouse cursors, scroll bars and distracting error messages. This is the same approach that you get in applications such as photo booths, cash dispensers etc.
I modified a method from the https://pimylifeup.com/raspberry-pi-kiosk/ website. There are probably other ways of achieving the same end. I'm also assuming that you're familiar with entering commands via SSH. Google it if you don't know how.
Brief summary...
Make a file called kiosk.sh
nano /home/pi/kiosk.sh
Install dependencies
sudo apt-get install xdotool unclutter sed
Add this to the kiosk.sh file. Substitute 'http://xxxurlToYourWebCam' with your local URL
#!/bin/bash
xset s noblank
xset s off
xset -dpms
unclutter -idle 0.5-root &
sed -i 's/"exited_cleanly":false/"exited_cleanly":true/'/home/pi/.config/chromium/Default/Preferences
sed -i 's/"exit_type":"Crashed"/"exit_type":"Normal"/'/home/pi/.config/chromium/Default/Preferences
/usr/bin/chromium-browser --noerrdialogs --disable-infobars --kiosk http://xxxurlToYourWebCam &
Interestingly if you're doing his setup over SSH, if you run sh kiosk.sh from an SSH terminal window on another machine the kiosk wont start. Probably as the active SSH session cant find a screen. If you run it directly on the Pi with connected keyboard it works fine
Most of the following is copied verbatim from 'how to' the link above, with a couple of changes
Run script from command line using service file
sudo nano /lib/systemd/system/kiosk.service
Add the following text to this file:
Note that using the hyperpixel, this only works if 'Type=simple' is changed to 'Type=forking' (as suggested in the commentary at the end of the above article)
There's some sort of bug/security procedure combo affecting the chrome web browser boot up time, such that it wont load chrome browser until it generate sufficient 'Entropy' in particular when there is no keyboard connected. Seriously. I think this has something to do with random number generation & cryptography and reflects how 'secure' the machine is. Or something.
Anyway, the effect is that our kiosk wont load for several minutes after boot, which is a pain especially if you need to do a quick demo.
The dual camera bird box build started off back in 2016, and has been live since the 2017 Spring nesting season. It was my second Raspberry Pi-based birdbox, and my first attempt to combine a Raspberry pi camera module with a USB webcam on the same Raspberry pi mini-computer. The system has video motion-capture, day + night illumination modes, an entrance hole activity logging mechanism, and also monitors temperature (?why not)...
Nearly fledging: My favourite picture of the 2019 season
This year (2019) is its first successful nesting season, seven great tit chicks fledged a few weeks ago, with another pair currently sitting on five eggs. I've had some requests on the Twitter about his box so this is an attempt to describe some of the modifications I've made over the last few years to fix various issues, and share some of the stuff I've learned along the way.
That's a 32mm entrance hole
The Cameras Camera 1 (SIDE): This is a Microsoft LifeCam Cinema usb webcam. It can only see in visible light - I used one of these in my first birdbox (side-view-box, 2016). A motion-jpeg (mjpeg) network video stream from this webcam is picked up by a remote PC running iCatcher CCTV software. iCatcher isn't able to include audio from this source.
Camera 2 (TOP): This is a Raspberry Pi v2 Infra-Red (IR) camera positioned above the nest space. An IR-cut module sits between the camera and the main nesting chamber and switches it between IR (night/dark) and visible light sensitivity (day/lit) . A motion capture application called pikrellcam uses this camera, with the videos saved directly to the same networked PC mentioned above. Camera-1 (the webcam) has a handy built-in microphone that pikrellcam cleverly uses, adding sound to the captured video from camera 2.
Camera 1 (Side) fits into height-adjustable slots. Entrance hole is on the Left of this pic
The entrance hole has two IR beams that once broken record the event to a file. Based on the order of breaking it's possible to work out whether the bird is coming or going. I added a visual indicator to check this is working, the video below shows the outer then inner beams being triggered whilst I balance precariously up a ladder...
The Brain: This is a Raspberry pi model B+. It's powered over a single cat5 network cable run of approx 150 meters using power-over ethernet (PoE), which also connects it to my home network.
Yes, I know the wiring is a mess...
Practicalities of video review
The side camera can be reviewed directly via iCatcher console on a remote PC, or via a webpage using any network connected device. Exporting video / screengrabs from iCatcher is a pain in the proverbials.
iCatcher Console with Camera-1 as source (USB webcam. Visible light only. No audio)
The top camera (Raspberry Pi cam) can be reviewed in a web browser on any network-connected device. Exporting video / images is really easy and can be downloaded directly via a web browser.
Pikrellcam with Camera-2 as source (Raspberry Pi v2 IR camera+IR cut (day mode)_white LEDs on. WITH Audio
Design evolution, 2017 to now (May 2019)
2017: The Bird Box went up in April. No birds came in all year with just the occasional wasp and spider triggering video capture (pikrellcam). The entrance hole had logged some attempts that were probably birds popping a head in, so assuming that the hole was too small, I enlarged it from 20mm to 32mm over the Winter. This wasn't as simple as just drilling the hole bigger as the entrance hole IR activity detector beams needed moving to accommodate a bigger hole. The 'glass partition' between the side camera and the main nesting chamber kept getting dusty and it also created an annoying reflection of the side camera (which could essentially 'see itself'), so I replaced it for a half height plywood partition that the camera could see over, giving it an unimpeded view into the box, as well as allowing its microphone do a better job.
This box did do some useful work that season - Using a programme called ffmpeg, I used it to transcode a video feed from a separate, less-powerful Raspberry pi/usb webcam combo on a Robin nest and live-stream the result to YouTube.
2018: The enlarged entrance hole meant birds were coming in periodically, probably looking for food. The default lighting remained on 'night mode' (just infra-red) as I thought the birds would be put off by the visible light LEDs. I also hadn't got round to making the day-night switching happen automatically.
By April we had a pair of great tits bringing in moss. I had the 'bright' idea of making the white leds come on when movement was detected by pikrellcam software to improve the daylight video capture... bad idea. What I actually ended up with was a system that kept switching from night to day mode whenever a bird came in. I think that the 'thunk' of the IR cut module switching between modes freaked them out so they nested in a neighbour's box instead. That was the end of Spring 2018 nesting.
THIS YEAR.. 2019: A great tit pair started making visits from early March this year. Nest building started 10 March, nine eggs laid and eight hatched on approx 17 April. The last one fledged two weeks ago 7:50am on Sunday 5th May. Unfortunately I missed them hatching as the PC where the videos are saved had crashed and I was away on holiday.
I also got around to fixing the day/night transition as described in this post, so lights come on at sunrise and off at dusk (switch to IR mode).
A selection of images / videos from nesting session 1
Cropped-in still image from camera 2. Lighting aided by south-facing window on RHS of this image
Feeding False Black Widow Spider
Difficulty swallowing another false black widow spider
The next image is a screen-grab from a top camera video. These are really easy to make using vlc media player.
An explosion of Great Tits
This is the male on the day the last chick fledged. He's looking a bit battered
Scruffy male adult after the chicks all fledged
So... I though that was it for this season, which was timely as we were just about running out of disk space on the PC that stores the captured video. I removed the remains of the deceased chick, and in the process broke the night illumination mode...
This one didn't make it :(
I switched from motion capture to timelapse on the last couple of days (pikrelcam makes this easy). I converted this to a timelapse using Adobe Lightroom then converted it to a manageable size in vlc. The dead chick above sadly passed away during this period which is evident particularly in the overnight section...
Poo-cam?
Daylight-sensitivity / video quality from the top down camera had dropped considerably over the previous year. With no physical partition, the chicks were able to have a lovely time jumping up and down and pooing on the the side camera too.......Leaving a 'poo-obscured cam in the day, cant see anything at night' bird box.
Surprise 2nd nesting
...But 5 days later, another Great tit pair have moved in (Fri 17 May) and re-built the nest. I've never had two back to back nests in the same box before.
And who miss, are you? this is the second female re-building the nest
So, poo-cam, poor lighting an degraded image quality will never do, so I removed the top camera section and cleaned the mess off the side camera that you can see in the picture above.
Top camera modifications... New Daylight LEDs / IR cut replacement
The Raspberry pi camera has poor low light sensitivity so I wanted to improve the lighting. I swopped some of the existing 5mm LEDs for some LED panels from Pimoroni- I've used these in four other bird boxes I built this year see here. They give a nice even illumination, avoiding the spotlight effect you get with 5mm LEDs. You can see my original attempt to avoid spotlighting with the original 5mm leds by pointing them up towards a white background, but they don't really make enough light for the Raspberry Pi camera which has fairly awful low light sensitivity which isn't surprising given that its lens aperture is a couple of mm.
New LED panels on underside of top section
I also swopped the IR cut for a new one (see this post) as the old one had fogged up.
2019 2nd nesting, updated performance...
Our five eggs have yet to hatch, the image quality is much better:
Cropped down to show detail. I like the symmetry in this one
I'm using a python module called ephem to trigger the day to night lights-off at sunset, however she's usually tucked up 1 to 1.5 hrs before then. Here you can see aside camera view before the upgrades (or cleaning the webcam...)
Female number two turning in for the night
The new pair has a different male
Male number 1 was looking very shabby at the end of the the last nesting session.
This clip shows make number 2 feeding female number 2 while she's incubating her five eggs, he's not scruffy, so Ithink that he's a different bird. Can't say much about her though.
This post was promoted by a post on the GarysShed blog after a discussion on triggering events based on whether it's day or night time.
To be fair, the whole post is an excuse to include following video from the BBC's 'Walk on the Wildside' series
I needed to modify the behaviour of the illumination LEDs in one of my Raspberry Pi-based birdboxes based on whether it is light or dark. This box has IR (Infra-Red) as well as visible light LEDs, I wanted the IR to operate all the time, and the standard LEDs to come on (and IR LED go off) only in the event of a daytime motion 'event', which could be triggered by any of: Entrance hole IR beam being broken, PIR insider the box triggered or motion detected on camera.
An IR-cut filter over the camera can then be switched on or off depending based on this too - IR LED off when visible LEDs are on. (An IR-cut filter turns an IR-sensitive camera into a daylight-only sensitive camera).
The idea was that I didn't want visible LEDs coming on during the night, mainly to disturb any occupants, I also didn't want this happening as it looks a bit odd from the outside:
Possible solutions:
1) Analyse camera image for brightness
2) Use a light-dependent resistor (LDR) to sense ambient light and modify LED behaviour based on this.
3) Implement a software-method to predict day vs night based on longitude and latitude
1) Analyse camera image for brightness. Borrowed code from here and here and here
convert test.png -colorspace hsb -resize 1x1 txt:- | sed -n 2p | sed 's/.*(//; s/).*//'
If run in the terminal, will output something like: 81.857%,38.706%,17.7462% where these figures are the HSB (hue, saturation, brightness) values from a 1x1 pixel converted version of the original image (test.png in this example)
2) Use LDR to monitor light. There's loads of examples out there how to do this, a randomly selected recent one here
At one time I did a merge of method 1 & 2 to which I've uploaded to a github repository Ambient-Light-Monitoring, the script is called ambient_lightMonitor.py. This reads actual light level via an LDR, and also takes image with a Raspberry Pi Camera and measures image brightness. All these variables are then written to a file for playing with which could be applied with in a variety of contexts..
3) Software method
I've tried two approaches, both rely on feeding the application the current location via longitude and latitude.
3.1) SunWait. A stand-alone program, an example use is described in a blog post here. Essentially you run a crontab job every ?minute that writes to a file to indicate the current light/dark state. You can then read that file into your application and base the outcome on whether its day (..light) or night (...dark). I could not get it to work..
3.2) Python module: pyephem, website here
This is a python module, so is used within a python script. You need to install python-dev first or the install of this module will fail. The module can then be installed with the pip python module installer
sudo apt-get install python-dev
sudo apt-get install python-pip  #if pip not available, e.g. on Raspbian Lite
sudo pip install ephem
Note, the sudo bit is important otherwise if you attempt to run a python script from rc.local containing this module (to run it at boot) the root user wont be able to find the module since without 'sudo...' it will install ephem under the user 'pi'
This approach worked for me. Longitude and Latitude can be generated on various websites, eg here, pyephem also uses height above sea level which I think I got off google earth. This would be aprticularly relevant if you're using it at the top of a mountain....
Refer to the example script light_dark.py in the above mentioned githib repository
3.3) ?Pikrellcam motion capture application
I use the awesome motion capture application PiKrellCam in my birdboxes. In its .config file is the facility to define location by longitude and latitude. I spotted a recent forum post querying if it was possible to switch an IR-cut filter on or off by using the day/night status within Pikrellcam to trigger a command to the GPOI pin(s) controlling the IR cut. See my IR-cut post on how to wire such a thing up.
Our 2017 double-camera bird nestbox went up a couple of
weeks ago. This is a two-camera setup
built around a conventional wooden box design... with a Raspberry Pi 3 for a
brain. The box gives a day and night (infra-red
/ IR) video options (e.g. to check for roosting at night), with separate 'from
above' IR and 'from the side' daylight cameras.
It has a temperature, humidity and ambient light sensors, the latter to automate
interior illumination with either visible light or IR leds, all of which have
high and low settings. It's connected
directly to the local network so all video storage is handled off-box (as it
were). All we need now is some birds...
2017 double camera bird box
Components
Brain: RaspberryPi 3. Most of the electronics gizmos
interface via a female to male header + perfboard 'shield' that plugs into the
GPIO header pins of the raspberry pi.
Power: This is via Power-overEthernet (PoE) using this TP-LinkPoE kit (~£20). This allows one cable for power and network access, and provides a 12v feed for the LED illumination and IR-cut,
which is also dropped to 5v for the Raspberry Pi using a RECOMR-7885.0-1.5 module (~£10)
Top-down camera (Cam
-1): InfraRed Raspberry Pi v2 camera module (~£22.79). This does higher resolution, fixed focus motion-activated
video and image capture, using the excellent PikrellCam
software. Video is saved direct to my local
network to overcome local storage issues.
InfraRed cut-out
filter: This switches a filter in
front of Cam- ( the Pi v2 IR camera), in the daytime for normal-looking daytime
images a and video. In low light/dark,
the IR filter is pulled back and IR led array activated for unobtrusive night
viewing. this is interfaced to the Pi's GPIOs via an L2930NE ic.
Side-view camera
(Cam-2): MicrosoftLifeCam Cinema (~£15 ebay). This is
the 'dumb-camera', and just generates a video stream that is monitored by a windows
PC running iCatcher
CCTV software.
Illumination: There
are 3 lighting circuits, (1)3x 'White' leds recycled from a broken torch, (2)4x
'Warm' leds (from the 'drawer of stuff'),
(3) an 36 LED IR led. The latter is
coupled to a 5k variable resistor as full power causes a white-out. These three lighting options work off the 12v
feed and have low and high settings. The
12V LED circuits are switched by the Pi's GPIO pins via a ULN2003AN ic. I used some different types of LEDs since I
didn't know what would work the best ultimately.
IR array
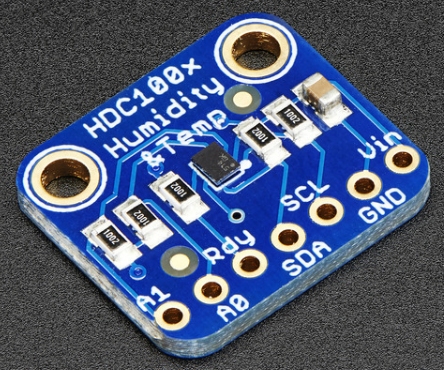
Temperature and
Humidity: HDC1008 I think these are now discontinued, but as
this was 'in the drawer of stuff', in it went. This
sits in a separate, vented compartment and logs outside temperature and humidity
to a MySQL database.
Entrance hole counter:
The box has a 25mm entrance hole, with in outer and inner IR detector beam,
as such we can distinguish between entering/exiting/head pop in/head pop out.
see these updated posts for a 2019 version of the entrance hole counter: http://nestboxtech.blogspot.com/search/label/EntranceCounter
Other stuff: I've also added inside and outside PIRs as
an alternative way of measuring activity - but haven't worked this bit up yet...
It's built in a modular fusion so that it can be
relatively easily dismantled. The
circuitry for the entrance counter is housed separately, into a compartment in the front panel of the
box, and connected via a hacked cat5 cable and jack to the Pi shield.
Some pictures...
Easy access side door.
Showing position of side camera and opaque windows for illumination
The main box area is under the wiring bit, with glass partition separating webcam section
Raspberry Pi Shield in detail
One of two vents for the HDC1008 temp and humidity sensor
In situ
As I develop more of the software side of things I'll post updates at intervals.
My 2017 Bird Nest Box should hopefully be up and running later this week, hopefully not too late for this season. This version has two camera: A 'from the side' camera which is a webcam (as described in previous posts), and a 'view from above' camera that uses as raspberry pi InfraRed (IR) camera with Infrared-cut to allow night and daytime viewing, I've added dimmable IR and non-IR led illumination. The RPi camera does video capture via the marvelous program PikrellCam.
Test screen shots below (Microsoft LifeCam above, Raspberry Pi v2 IR cam below)
Daytime
Daytime previews
Night-time
Night time previews
I've also included an entrance hole counter and facility to measure ambient temperature and outside light levels.